If you’ve ever worried about dropping your guitar while performing, the Dunlop Dual Design Straploks
In the following article, we’ll discuss how to install the Dunlop Dual Design Straploks. We installed them on a Squier SE Strat that still had the original strap buttons on it. In our case, we installed the strap locks to allow us to use straps that had the system already installed.
Materials and Tools
To do this installation, all you need is a strap, the Dunlop Dual Design Straploks, a #2 Phillips screwdriver, and a set of pliers (optional). Not all straps will work with this system. Many padded leather straps, such as Levy’s 3.5” Padded Leather Guitar StrapThough the instructions recommend to drill larger holes in the guitar, this isn’t necessary. The existing holes are usually larger enough for the screws to easily thread in. Keep in mind that if you don’t drill it may require a little more force to screw in the strap locks.
If you find that the existing screw holes are too loose and the screw isn’t biting in properly, the holes can be filled using toothpicks and wood glue
Preparation
Before you can begin, you need to remove the existing strap locks from the guitar. All you’ll need for this is the #2 Phillips screwdriver we mentioned previously. Just unscrew the existing strap buttons and set them aside. You may want to hold onto these in case you decide to sell the guitar in the future. If you’re guitar doesn’t have felt washersGuitar Installation
Now you can install the Dunlop Dual Design Straploks. First remove the strap retainer from the strap button by pushing the button in the middle and pulling it out. Then, put the screw through the strap button and screw it into the existing holes in the guitar. You’ll want to use the screws that came with the strap locks. These screws are usually a little thicker than the existing screws. This makes them more secure in the existing holes. Also, some existing screws have a large head that won’t fit inside the strap button. It’s important that the screw can fit in the strap button to allow the strap retainer to fit properly. Screw the strap button in until it’s hand tight. Don’t over-tighten, as this can damage the guitar. If you strip the holes, you'll need to fill them in and start over.Strap Installation
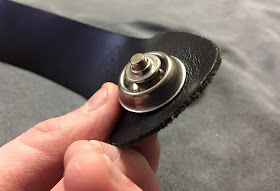
The strap installation step can be a little tricky. To install the strap, put the strap retainer through the strap. This will need to clear the hole in the strap for the washer and clip to fit on. Then put the washer on. Finally, the hardest part is to get the clip in place. This takes quite a bit of force, and is the one thing we dislike about this system. The clip fits in a groove after the washer has gone on and prevents the washer from coming loose.
To get the clip in place, you can squeeze it against the shaft of the retainer with a pair of pliers. If you don’t have pliers, you can also push it into place with a flat screwdriver, but this is more difficult. Don’t try to install this with your hands. You’re unlikely to be able to get the small clip in place, and even if you do, it will be painful.
Though difficult to install, this strap lock design is actually pretty good. It evenly distributes the weight of the guitar over the strap hole, preventing stretching. This can be a problem with some strap buttons and it will easily ruin a strap.
Final Steps
Before using your strap locks, there are a few things you’ll want to do. First, Dunlop recommends lubricating the strap locks. The strap retainer has small ball bearings inside. If they aren’t kept lubricated, they can get stuck. We’ve never had this issue with the strap locks before, but it’s something to consider. To prevent this from happening, spray a lubricant in the strap button such as WD-40One final thing you should do is give the system a good test. Put the strap lock in, and listen for a click. If you hear the click, it's latched in place. Give it a solid tug to make sure that it doesn’t come loose and the whole system is secure. At this point, you’re ready to start using your new strap locks.
Our Opinion
Overall the Dunlop Dual Design Straploks are a solid choice for securing your instrument against unexpected falls.As previously mentioned, the system isn’t perfect, but none of these issues are a deal breaker. We’ve mentioned that the strap retainer clip can be difficult to install, and that the system requires occasional lubrication to keep it working smoothly.
There are a few advantages to using this system over some of the others. First, the entire system is pretty low profile, and doesn’t drastically change the look of your guitar. Also, it’s available in nickel, black


No comments:
Post a Comment